American

Southern Utah Desert Burger
Ingredients 1 cup plain greek yogurt 7.76 oz of chipotle sauce (make sure to buy sauce, not chipotles in adobo sauce) 2 Anaheim chili peppers 4 slices pepper jack cheese 4 whole grain hamburger buns 1 avocado Romaine lettuce For the burger 1 pound ground beef 1 egg ½ teaspoon salt ¼ teaspoon onion powder ¼ teaspoon garlic powder ¼ teaspoon pepper ¼ teaspoon Smoked Paprika Directions Preheat your grill to medium-high heat. While your grill is preheating, make your chipotle sauce. In a small bowl combine the Greek Yogurt and the chipotle sauce. Stir until smooth and set aside. Next, take the peppers and cut in half coring and deseeding it. Set aside for now. In a small bowl add all the ingredients for the burger. Using your hands mix well and form into 4 equal burgers. Place the peppers on the grill and cook each side for about 5 minutes or until the pepper is lightly charred. While the peppers are cooking place the burgers on the grill and cook for 5–8 minutes per side or until cooked through. Top each burger with a slice of pepper jack cheese and cook until melted. If desired you can also toast the hamburger buns on the grill for about 2 minutes. To assemble burgers, top a bun with the burger and cheese, ½ of a pepper, ¼ of an avocado, spread 2 tablespoons of chipotle sauce on other bun, top the burger with it, and enjoy! NUTRITIONAL INFO PER SERVING Calories 390 (150 from fat) Total fat 16g Saturated fat 5g Cholesterol 130mg Sodium 830mg Carbohydrate 31g (7g dietary fiber, 6g sugar) Protein 34g WARNING: This post is not intended to replace the advice of a medical professional. The above information should not be used to diagnose, treat, or prevent any disease or medical condition. Please consult your doctor before making any changes to your diet, sleep methods, daily activity, or fitness routine. iFit assumes no responsibility for any personal injury or damage sustained by any recommendations, opinions, or advice given in this article.
June 11, 2019
Read More

Turkey Dill and Cucumber Tea Sandwiches
Ingredients 1 cucumber ½ pound turkey, sliced (optional) 28 slices of bread (whole wheat recommended) Dill spread: 4 ounces low-fat cream cheese, room temperature 5.3 ounces plain, Greek yogurt 4 Tablespoons fresh dill, minced 1 teaspoon garlic salt ½ teaspoon black pepper 1 Tablespoon fresh lemon juice Directions Use a mixer to blend together the cream cheese and Greek yogurt until smooth. Add dill, garlic salt, black pepper, and lemon juice. Mix until well combined. Spread ½ Tablespoon of dill spread on two slices of bread. Place the cucumber and a slice of turkey on top. Cut the crust off of the sandwiches, then slice each sandwich in half. Serve and enjoy! *Analysis done with turkey NUTRITIONAL INFO PER SERVING Calories 230 (30 from fat) Total fat 3.5 g Saturated fat 1 g Cholesterol 15 mg Sodium 390 mg Carbohydrate 34 g (4 g dietary fiber, 5 g sugar) Protein 7 g WARNING: This post is not intended to replace the advice of a medical professional. The above information should not be used to diagnose, treat, or prevent any disease or medical condition. Please consult your doctor before making any changes to your diet, sleep methods, daily activity, or fitness routine. iFit assumes no responsibility for any personal injury or damage sustained by any recommendations, opinions, or advice given in this article.
June 2, 2019
Read More
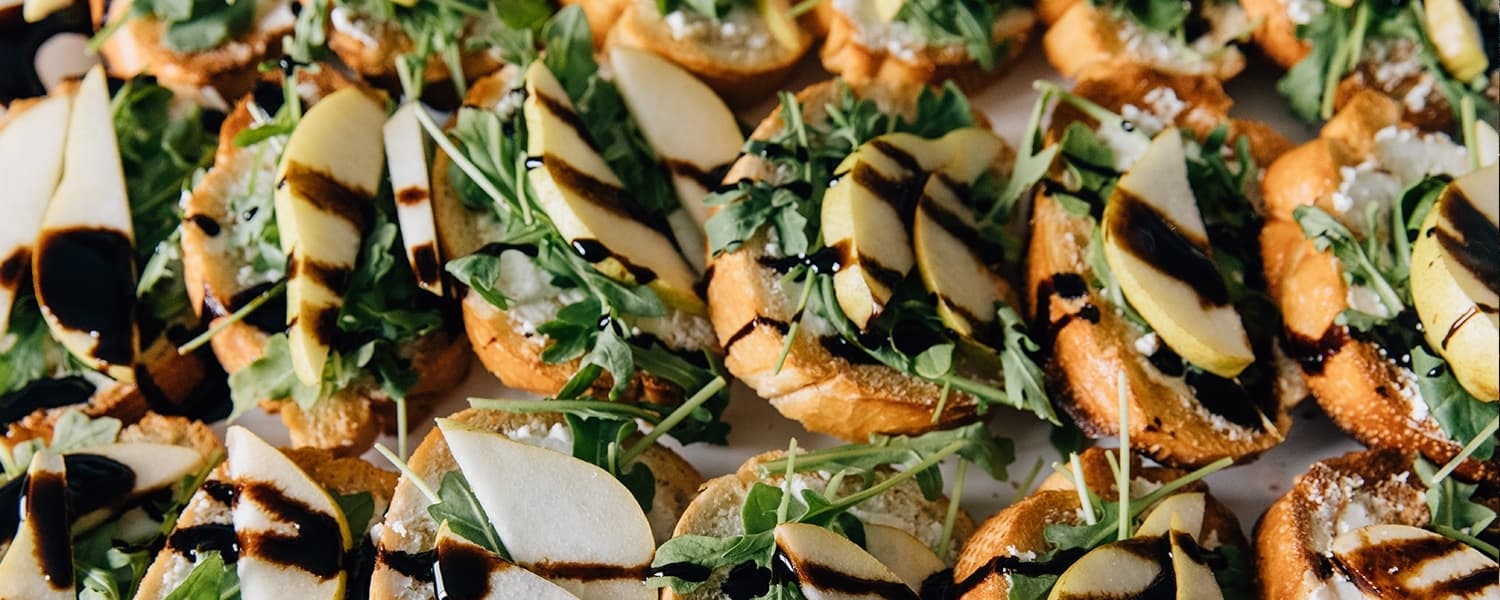
Pear Arugula Crostini with Balsamic Glaze
Ingredients 16 slices of bread thinly sliced (french bread recommended) 16 ounces Goat Cheese 4 cups arugula 1 pear, thinly sliced ⅓ cup of balsamic glaze *olive oil cooking spray Directions Turn your oven to broil. Take 16 slices of your choice of bread and spray with one side of olive oil cooking spray. Place on a cookie sheet and broil for about a minute or until golden brown. Top each bread with 2 tablespoons of goat cheese, ¼ cup of arugula, 2 thin slices of pear and drizzle with 1 teaspoon of balsamic glaze. Repeat with each slice. Serve and enjoy! NUTRITIONAL INFO PER SERVING Calories 190 (80 from fat) Total fat 9g Saturated fat 6g Cholesterol 20mg Sodium 290mg Carbohydrate 18g (1g dietary fiber, 3g sugar) Protein 9g WARNING: This post is not intended to replace the advice of a medical professional. The above information should not be used to diagnose, treat, or prevent any disease or medical condition. Please consult your doctor before making any changes to your diet, sleep methods, daily activity, or fitness routine. iFit assumes no responsibility for any personal injury or damage sustained by any recommendations, opinions, or advice given in this article.
June 1, 2019
Read More
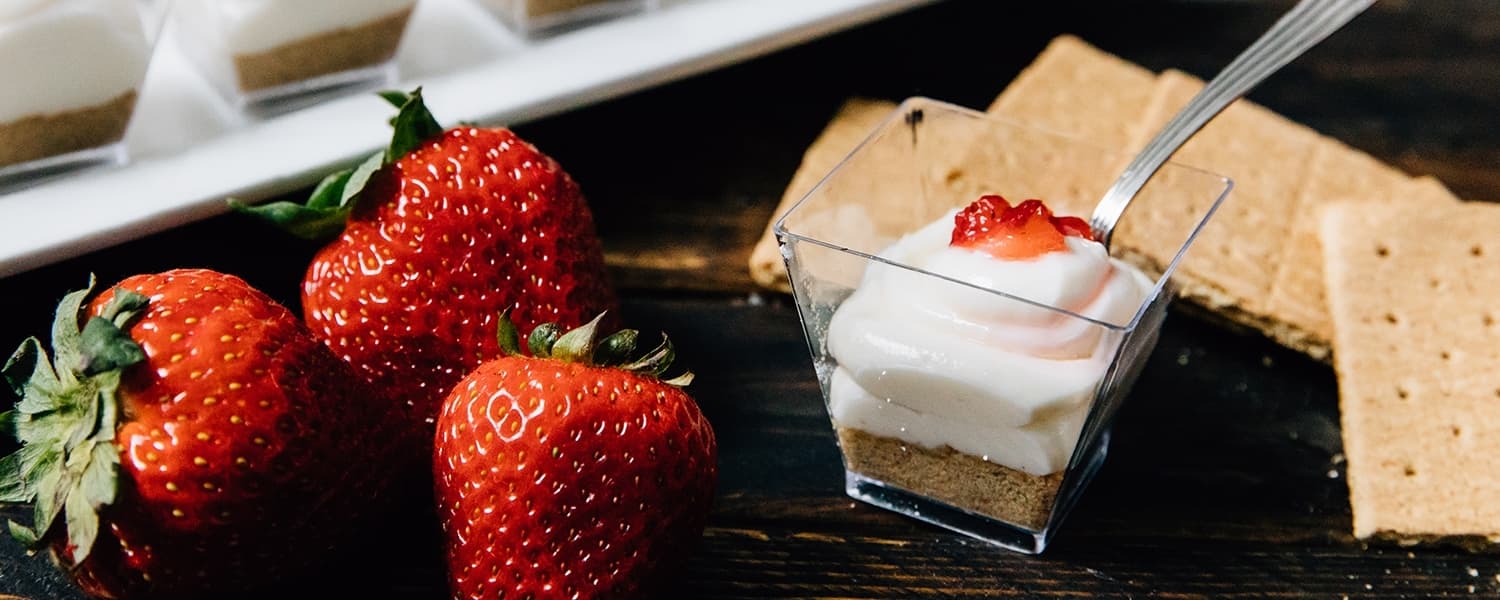
Cheesecake Shooters
Ingredients 8 ounces low fat cream cheese 1 cup Tillamook vanilla farmstyle greek yogurt 1½ cup powdered sugar 1 cup of crushed graham crackers 2 cups fruit of choice diced. Directions Blend together cream cheese and greek yogurt until smooth. Place 1 tablespoon of crushed graham crackers then layer with 3-4 tablespoons of cream cheese mixture (depending on shooter size). Top with a tablespoon of diced strawberries. Refrigerate until ready to eat and enjoy! NUTRITIONAL INFO PER SERVING Calories 120 (50 from fat) Total fat 6g Saturated fat 3g Cholesterol 15mg Sodium 80mg Carbohydrate 15g (1g dietary fiber, 11g sugar) Protein 3g WARNING: This post is not intended to replace the advice of a medical professional. The above information should not be used to diagnose, treat, or prevent any disease or medical condition. Please consult your doctor before making any changes to your diet, sleep methods, daily activity, or fitness routine. iFit assumes no responsibility for any personal injury or damage sustained by any recommendations, opinions, or advice given in this article.
May 31, 2019
Read More
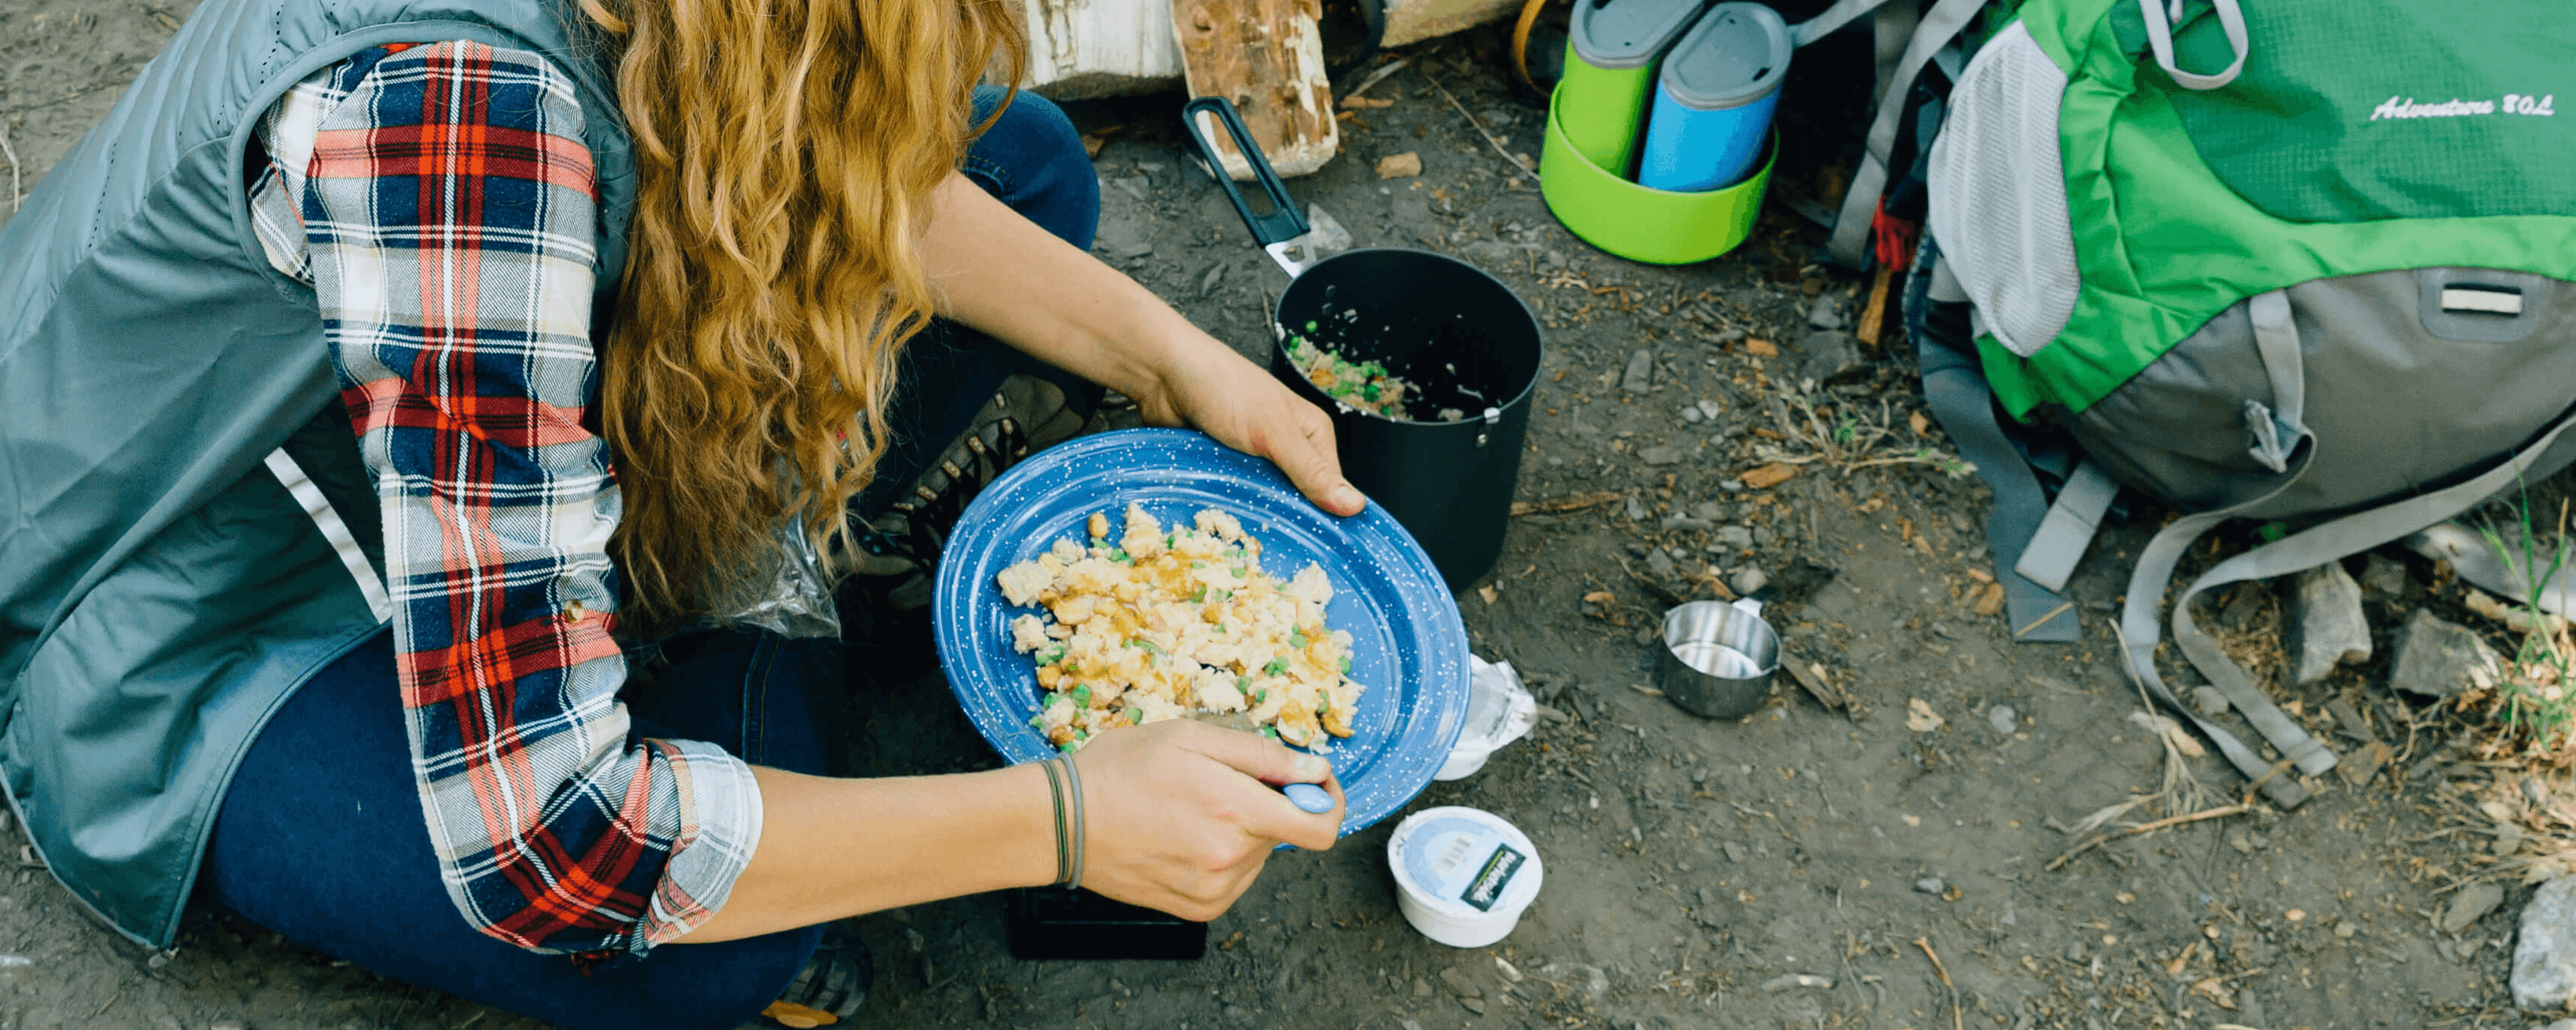
Easy Camping Recipes
From a simple breakfast to multiple dinner options, here are our best recipes for camping, backpacking, and the great outdoors. A little prep at home can save you time and hassle at your campsite. Plus, you know we're always going to make things a little healthier for you! ------------ Strawberry Scones Kodiak pancake mix has whole grains and extra protein. With a little added fruit and sugar, we turned it into sweet, warm scones that are perfect for the great outdoors! Ingredients 1 cup protein Kodiak pancake mix ½ cup dried strawberries ¼ cup powdered sugar ½ cup water Directions At home, pack pancake mix, strawberries, and sugar in a ziplock bag. At camp, stir together the dry mix and water. Divide batter into fourths, then place all 4 scones on a hot pan. Cover. Cook until bottoms are golden brown, then flip. Cook until golden brown on both sides and done in the middle. Enjoy warm or cold. ------------ Chicken & Couscous Couscous is a great carb source for backpacking, because it is light and requires minimal cooking. Look for whole wheat versions for added fiber. You can enjoy this flavored with ranch or honey mustard! Ingredients ½ cup whole wheat couscous ¼ teaspoon onion powder ¼ cup sun-dried tomatoes ¼ cup dehydrated peas 2 Tablespoons pine nuts 1½ ounces ranch dressing or honey mustard (1 individual cup) 3 ounces cooked chicken in foil-lined packet Directions Place all the ingredients in a resealable bag, keeping the ranch and chicken in their packages. On the trail, remove chicken and dressing and set aside. Add 1 cup of boiling water to the ziplock bag and mix. Set aside for 5 minutes. Fluff with a fork and add chicken and sauce to the bag. Mix well and enjoy! ------------ Mushroom Spaghetti This vegetarian pasta is a great backpacking option. You can also add chicken for extra protein. I like to use little packages of marinara from the deli, but you can take your favorite variety in a small bottle, like a travel shampoo bottle. Ingredients 4 ounces whole wheat spaghetti noodles ½ cup freeze-dried mushrooms 2 Tablespoons pine nuts ¼ teaspoon dried oregano ½ teaspoon dried basil ½ teaspoon powdered garlic 3 ounces single-serve cups marinara sauce Directions At home, in a plastic bag, add your noodles (break into thirds for easy packing). Add the mushrooms, pine nuts, oregano, basil, garlic, and marinara. Keep the marinara in its package. At camp, bring 2 cups of water to a boil. Add all the ingredients (other than the marinara sauce) and cook until almost all of the water is absorbed. Add marinara and mix well. Enjoy warm, out of the bag for easy cleanup! ------------ Peanut Noodles This is an easy meal for the trail with an Asian flare. Warm, rich, carbs are the perfect way to refuel after a long day of hiking. Ingredients 4 ounces whole wheat spaghetti noodles 1½ ounces single-serve cups of peanut butter 1 Tablespoon soy sauce (1 to-go packet) ¼ teaspoon crushed red pepper flakes ¼ cup roasted peanuts Directions At home, place noodles in a resealable bag (break into thirds for easy packing). Add the peanut butter, soy sauce, red pepper flakes, and peanuts. At camp, bring 2 cups of water to a boil. Add noodles and cook until almost all the water is absorbed. Add remaining ingredients and mix until smooth. Makes 1–2 servings. Enjoy warm. ------------ Rice & Beans Wrap This filling dish is full of healthy carbs to refuel those muscles after a day hiking. This is great on it’s own, but feel free to add chicken or wrap it in a tortilla for a little something extra. Ingredients 1 cup brown rice (look for a quick cooking variety) 1 (15 ounce) package refried black beans* ¼ teaspoon powdered garlic ¼ teaspoon salt ¼ teaspoon cumin 1 whole wheat tortilla Directions At home, add spices to the brown rice and store in a resealable bag. On the trail, dump everything into a pot with 1½ cups water. Bring to a boil and simmer, stirring constantly until thickened and rice is cooked—usually about 10 minutes, depending on the kind of quick cooking rice you choose. Wrap in a tortilla and enjoy! ------------ Salmon Lemon Couscous You can prep this quick, high-protein salad before you head into the great outdoors. It can be made while you’re hiking or camping, with either hot or cold water. Ingredients ⅓ cup couscous ¼ cup pine nuts ¼ cup peas ¾ teaspoon lemon pepper 3 ounces cooked salmon in foil-lined packet ⅓ cup water (cold or hot) Directions Place the couscous, pine nuts, and lemon pepper in a pint-sized, resealable bag, leaving the salmon in its pouch. When you’re ready to eat it, remove the salmon packet. Heat the water, if desired, then add to the sandwich bag. Seal, then set aside for 10 minutes. Fluff up with a fork, stir in the salmon, and enjoy!
May 21, 2019
Read More
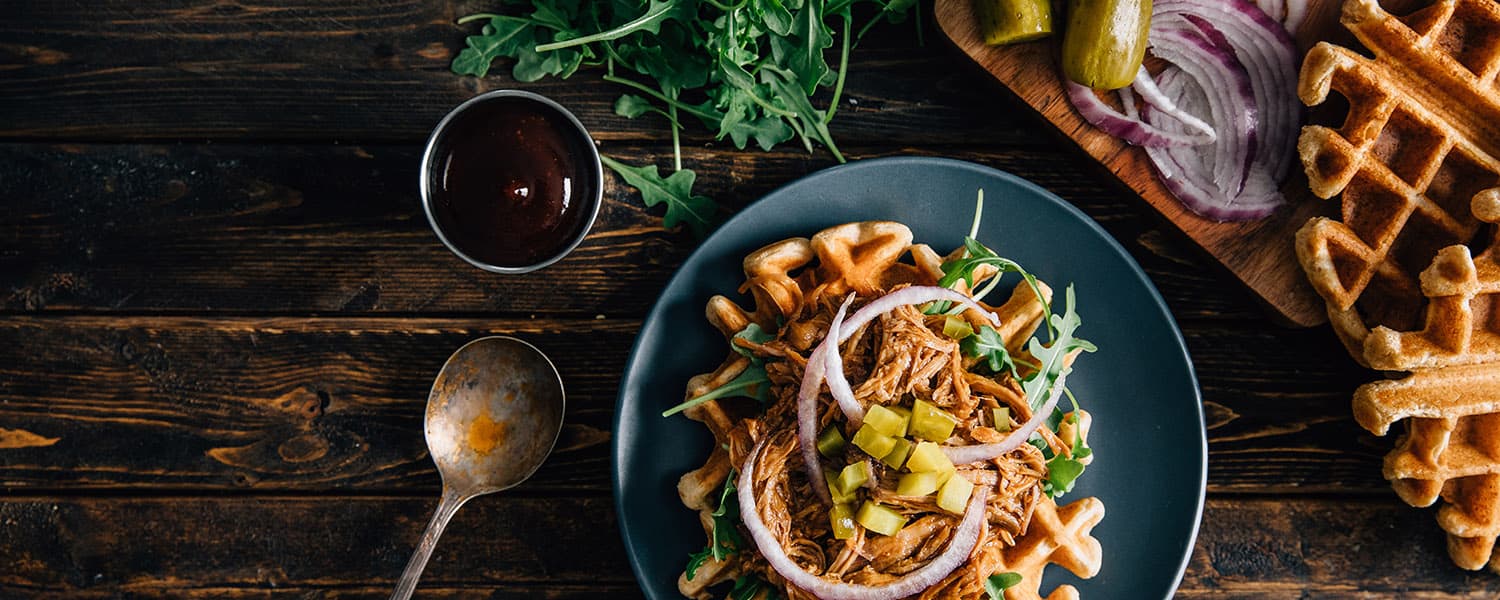
Pulled Pork Waffle Sandwich
Ingredients 2½ cups Kodiak superfood pancake mix 1¾ cups water 2 cups shredded pork (about 1 pound tenderloin) ½ cup barbecue sauce (I like Sweet Baby Ray’s) 2 cups arugula ¼ red onion, thinly sliced 4 small dill pickles, thinly sliced Directions Combine pancake mix and water. In a preheated waffle iron, pour about ⅓ cup batter and cook until golden brown and slightly crispy. Combine pork with barbecue sauce. Top one waffle with pork, arugula, red onion, and pickles. Top with another waffle and enjoy! NUTRITIONAL INFO PER SERVING Calories 440 (60 from fat) Total fat 6g Saturated fat 2g Cholesterol 1mg Sodium 1100mg Carbohydrate 60g (7g dietary fiber, 22g sugar) Protein 35g Kodiak superfood pancake mix is a great way to start your morning with long-lasting energy. It is packed with eight different B vitamins. Vitamin B1 plays an important role in your metabolism by helping convert nutrients into energy. Vitamin B2 acts as an antioxidant, as well as helping convert food into energy. Vitamin B3 plays a role in metabolism and DNA production and repair. Vitamin B5 is involved in hormone and cholesterol production as well as helping get energy from food. Vitamin B6 is involved in red blood cell production and amino acid metabolism. Vitamin B7 is necessary for fat and carbohydrate metabolism and helps regulates gene expression. Vitamin B9 is required for cell growth, formation of red and white blood cells, and proper cell division. Vitamin B12 is vital for neurological function, red blood cell development, and DNA production. Chia and flax are also included in the pancake mix, and are great sources of omega-3 fatty acids, fiber, and antioxidants. Arugula is a decent source of folate, calcium, iron, magnesium, potassium, and vitamins A, K, and C. It also is heavy in phytochemicals (naturally occurring compounds that are responsible for the color, flavor, and odor of plant foods) that are packed with antioxidants and provide various health benefits by protecting us from a variety of diseases. Arugula also has a peppery taste that makes it a great addition to any salad or sandwich. If you are storing it, keep it fresh by keeping it dry and refrigerated. The best way to do this is to store it in a plastic bag with a dry paper towel to soak up any moisture. If done properly, arugula can be stored for up to two weeks. These sandwiches are an excellent source of protein with an incredible 35 grams of protein per serving. Protein is an important building block for your muscles, cartilage, skin, and blood cells! It is also more filling than carbohydrates and requires more of your body’s energy to digest it, so extra protein is helpful for those who are trying to build muscle or lose weight. This meal is full of beneficial nutrients that will keep you full and satisfied. WARNING: This post is not intended to replace the advice of a medical professional. The above information should not be used to diagnose, treat, or prevent any disease or medical condition. Please consult your doctor before making any changes to your diet, sleep methods, daily activity, or fitness routine. iFit assumes no responsibility for any personal injury or damage sustained by any recommendations, opinions, or advice given in this article.
April 18, 2019
Read More
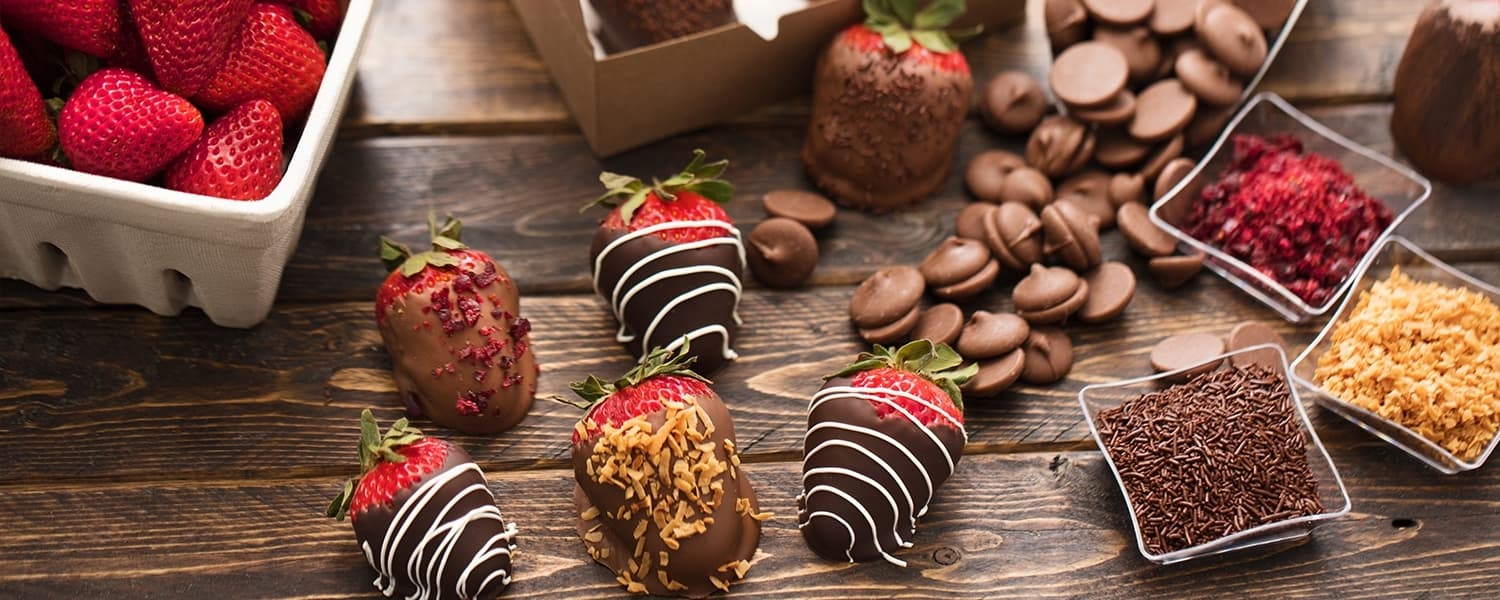
Chocolate Strawberries
Ingredients 1 pound fresh strawberries 12 ounces high-quality (milk or dark) chocolate* Directions Make sure your strawberries are at room temperature—about 68°F. (If they are chilled at all, they will sweat after dipping. Also, your fruit must be completely dry, so no washing immediately prior to making this recipe. Buy pre-washed, or wash, then let them dry for at least a day before dipping.) Melt the chocolate either in a double boiler or a microwave. (If melting in the microwave, heat for 3 minutes at 20–30% power, stir, then repeat until melted. If melting in a double boiler, heat on low and allow the chocolate to melt for 15–20 minutes while mixing. You don’t want to get the chocolate too hot or allow steam from the bottom pot to come out and get into the chocolate, so do not boil the water in the base pot. To make sure that your pots aren’t getting too hot and burning the chocolate, you should be able to touch, but not leave your hand on, the lower pot. You should also be able to touch and comfortably leave your hand on the top pot. It should be just warmer than room temperature.) Let it cool to 68–72°F. Otherwise, it will streak. (To know if your chocolate is ready without using a thermometer, pull out a small amount of chocolate with a fork, then let it drizzle back into the bowl. The drizzled bit should remain on top and not melt back in. At this point, your chocolate is ready to use.) Hold the stem of each berry, then dip about ¾ into the chocolate. Pull out and let drip, then place on parchment paper to cool. Top with coconut, sprinkles, or other toppings, if desired, while chocolate is still soft. Cool. (This will work best if your kitchen is at about 68°F. You may want to open a window to make sure your kitchen is cool enough for the chocolate to set.) Enjoy! (You can store any leftovers in the fridge...but I doubt there will be any!) *Be sure to use high-quality chocolate—preferably designed for chocolate making. Use nothing that contains wax. NUTRITIONAL INFO PER SERVING Calories 90 (40 from fat) Total fat 4.5g Saturated fat 3g Cholesterol 0mg Sodium 0mg Carbohydrate 13g (1g dietary fiber, 10g sugar) Protein 1g WARNING: This post is not intended to replace the advice of a medical professional. The above information should not be used to diagnose, treat, or prevent any disease or medical condition. Please consult your doctor before making any changes to your diet, sleep methods, daily activity, or fitness routine. iFit assumes no responsibility for any personal injury or damage sustained by any recommendations, opinions, or advice given in this article.
April 17, 2019
Read More
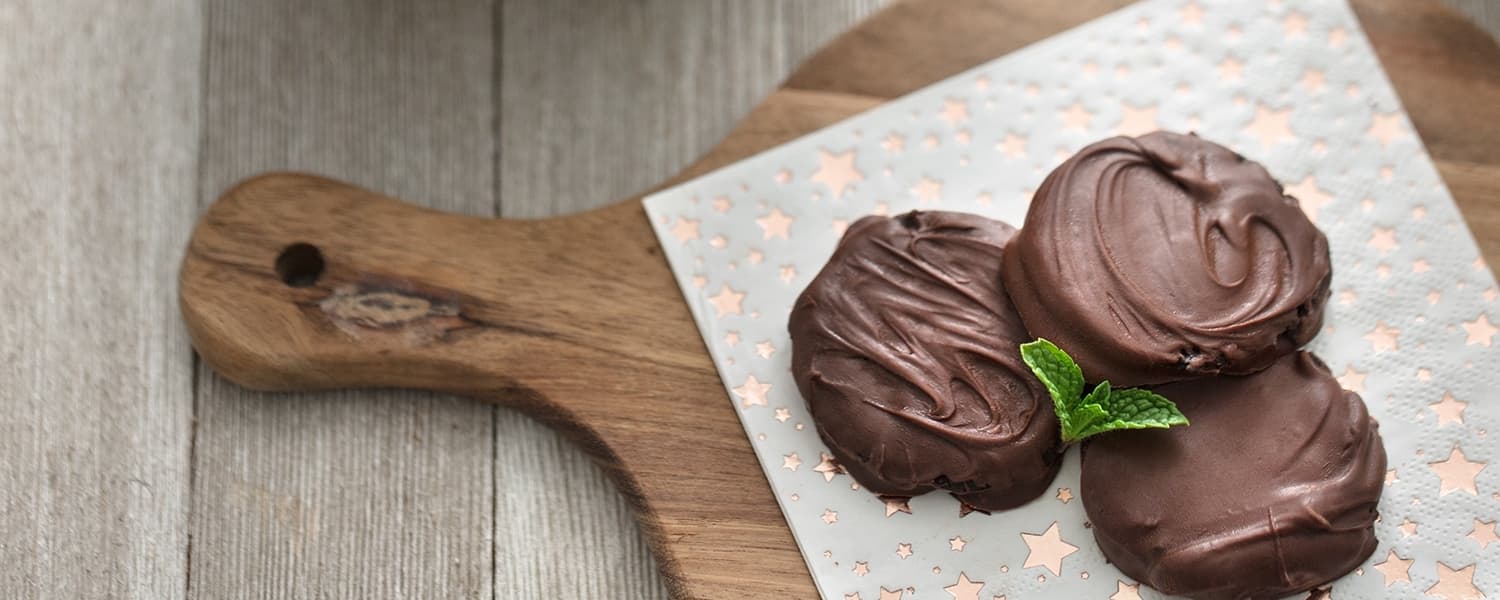
Healthier Mint Chocolate Cookies
Ingredients Cookies 1 (15-ounce) can black beans, drained and rinsed 3 tablespoons applesauce 2 tablespoons honey 1 tablespoon pure vanilla extract 3 drops peppermint extract ½ teaspoon salt ½ teaspoon baking soda ½ teaspoon baking powder 2 tablespoons whole wheat pastry flour 6 tablespoons cocoa powder ¼ cup mini dark chocolate chips Chocolate coating ½ cup mini dark chocolate chips 2 teaspoons coconut oil 1 drop peppermint extract Directions Leaving out the mini dark chocolate chips, place all ingredients in a food processor. Blend until smooth, making sure to scrape the sides. Stir in the chocolate chips, then chill for 20 minutes. While the dough chills, preheat the oven to 350°F. Roll the chilled dough into little balls, then flatten them. They should be about the size of a quarter. Place on a greased or parchment-lined baking sheet. Bake for 15–18 minutes. Cool completely on the baking sheet. (This helps make them crunchy!) Once cookies have cooled completely, melt the chocolate for the coating. In a microwave-safe bowl, add the chocolate and coconut oil. Microwave for 30 seconds at a time, stirring in between until completely melted. Once chocolate is melted, add the peppermint oil and stir. Dip the cookies in the chocolate, then place on a foil- or parchment-lined pan. Cool until the chocolate hardens. Store in an airtight container. *Pro tip: Enjoy these frozen for a cool treat! NUTRITIONAL INFO PER SERVING Calories 80 (25 from fat) Total fat 3g Saturated fat 1.5g Cholesterol 0mg Sodium 150mg Carbohydrate 12g (3g dietary fiber, 6g sugar) Protein 2g WARNING: This post is not intended to replace the advice of a medical professional. The above information should not be used to diagnose, treat, or prevent any disease or medical condition. Please consult your doctor before making any changes to your diet, sleep methods, daily activity, or fitness routine. iFit assumes no responsibility for any personal injury or damage sustained by any recommendations, opinions, or advice given in this article.
April 2, 2019
Read More
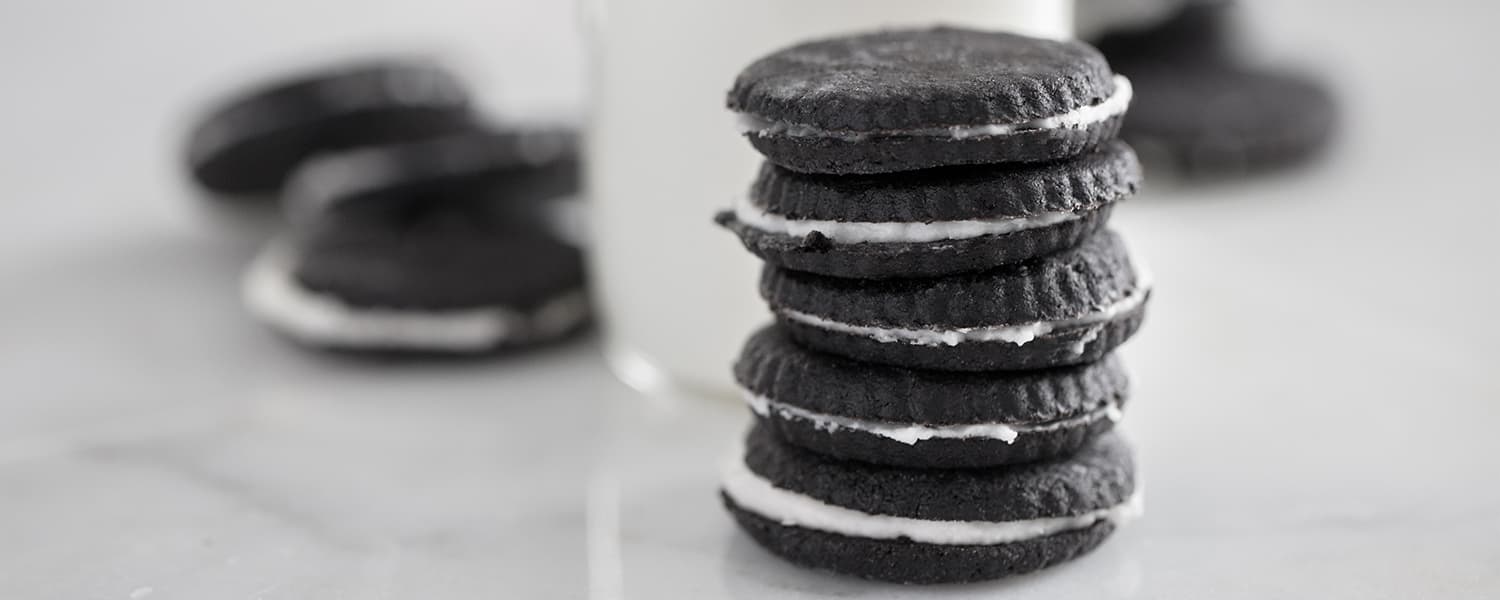
Chocolate Sandwich Cookies
Ingredients Cookies ¾ cup whole wheat pastry flour 6 tablespoons Dutch cocoa powder 6 tablespoons sugar ¼ teaspoon salt ¼ teaspoon baking soda 1 teaspoon pure vanilla extract ¼ cup coconut oil 3 tablespoons milk of choice 2 tablespoons honey Filling ½ cup powdered sugar ½ teaspoon pure vanilla extract ¼ cup coconut oil Directions: In a medium-sized bowl, whisk together pastry flour, cocoa powder, sugar, salt, and baking soda. In a separate bowl, cream together the vanilla, coconut oil, milk, and honey until well combined. Add the wet ingredients to the dry ingredients and mix until a dough forms. Place the dough on a large piece of plastic wrap, then form into a flat disc. Wrap the disk, then chill for 20 minutes. While dough is chilling, preheat the oven to 300°F. Flour a clean counter space, then place the dough on it. Roll out the dough until it’s about ¼-inch thick, then cut small circles out. Place the circles on a greased cookie sheet. Repeat with scrap dough. Bake for 10 minutes. Remove from oven and cool on the pan for 10 minutes. (This allows the cookies to harden up a bit.) While cookies are cooling, make the cream filling. Blend together all the ingredients for the filling until smooth. Place about two teaspoons of the cookie filling on top of one of the chocolate cookies, then top with another cookie to create a sandwich. Repeat with the remaining cookies and filling. Keep in an airtight container. (I like to freeze mine!) NUTRITIONAL INFO PER SERVING Calories 120 (70 from fat) Total fat 8g Saturated fat 6g Cholesterol 0mg Sodium 60mg Carbohydrate 15g (1g dietary fiber, 10g sugar) Protein 1g WARNING: This post is not intended to replace the advice of a medical professional. The above information should not be used to diagnose, treat, or prevent any disease or medical condition. Please consult your doctor before making any changes to your diet, sleep methods, daily activity, or fitness routine. iFit assumes no responsibility for any personal injury or damage sustained by any recommendations, opinions, or advice given in this article.
April 2, 2019
Read More